
Stripe Checkout is convenient, but sometimes the payment form has to be part of your own site: the same fonts and colors, no jump to someone else's address. That is what the Payment Element is for: ready-made protected Stripe fields that you embed in your page. We will connect it to the shop: create a PaymentIntent on the server, hand its client_secret to the browser, confirm the payment with stripe.confirmPayment, deal with statuses, 3-D Secure and card errors, and again leave the final word to the webhook.
Checkout or your own form
Checkout (lesson 039) is a ready-made Stripe page: the simplest and fastest option. The Payment Element is a form inside your page: you design the layout and the text around the field, while the card number is typed into a protected Stripe iframe and never reaches your server (SAQ A, lesson 038). The price of freedom is code: you write the button, the errors and the return after 3-D Secure.
| Option | Where the card is entered | Code |
|---|---|---|
Checkout (hosted_page) | on the Stripe page | the least |
Embedded Checkout (embedded_page) | Stripe iframe inside your page | little |
Payment Element + Checkout Sessions (ui_mode: 'elements') | Stripe fields in your layout | medium |
| Payment Element + PaymentIntent | Stripe fields in your layout | the most |
💡 An honest note on Stripe's recommendation. Right now (October 2026) the Stripe docs advise Checkout Sessions with the Payment Element for most new integrations:
ui_mode: 'elements', and in ReactCheckoutElementsProviderfrom@stripe/react-stripe-js/checkoutpluscheckout.confirm. There is less code, and taxes and discounts come ready. We study PaymentIntent because it also sits underneath Checkout, so statuses,client_secretand webhooks are the same on both paths.
PaymentIntent: the "folder" of one payment
A PaymentIntent is a Stripe object that carries one payment from intention to result: amount, currency, payment method, status, errors. An analogy: a case folder. You open it when the amount is known, the customer puts a card into it, Stripe records what happened. If it fails, the folder stays and the customer tries again.
Together with the folder Stripe gives you a client_secret: the key to that very folder. With it the browser can confirm this payment, but cannot change the amount or see other people's payments. It is not the sk_… secret key, which never leaves the server; still, only the buyer of this order may see the client_secret: it is not logged and not put into a URL.
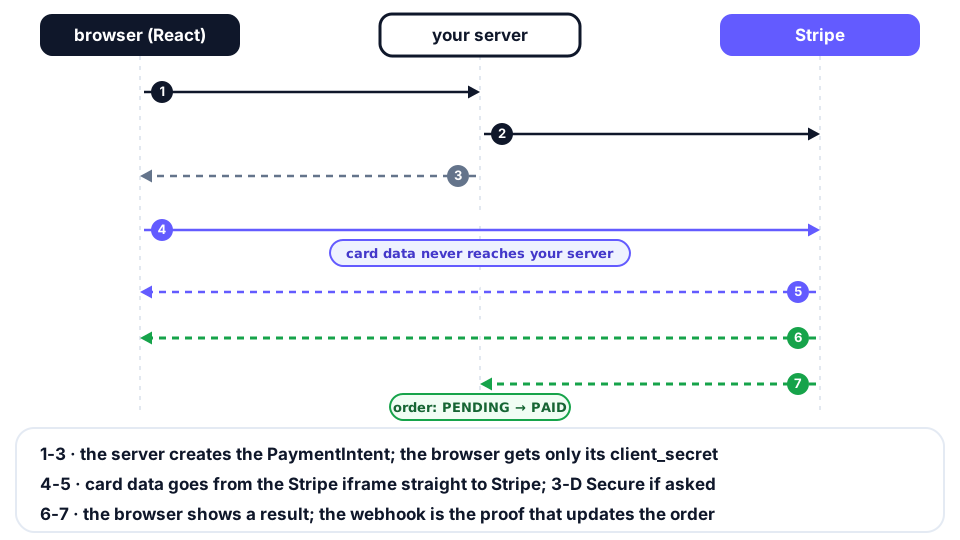
Steps 1-3: the server creates the PaymentIntent and returns only the client_secret to the browser. Steps 4-5: stripe.confirmPayment sends the card data from the iframe straight to Stripe; if needed, Stripe.js opens the 3-D Secure window. Steps 6-7: the browser learns the result, while the real confirmation arrives by webhook.
Step 1. The server creates the PaymentIntent
Let us add a linking field to Order (npx prisma migrate dev --name add_payment_intent_id):
